
Configure Pin Swapping for Component
Contents
Parent page: PinSwapper Dialogs
The Configure Pin Swapping for Component dialog
Summary
The Pin Swapping for Component dialog provides controls to configure swap settings for the pins and subparts of each component on the board. Use the dialog to enable or disable pin/part swapping and assign or change swap groups.
Access
The Pin Swapping for Component dialog can be opened in the following ways:
- In a PCB document, right-click on the component then select Component Actions » Configure Pin/Part Swapping.
- In a schematic document, right-click on the component then select Part Actions » Configure Pin Swapping.
- Click the Configure Component button in the bottom left-hand corner of the Configure Swapping Information In Components dialog (accessed by clicking Tools | Swapping | Pin/Part Swapping » Configure » Configure Component).
- Double-click on any of the components in the Configure Swapping Information In Components dialog.
Pin Swapping Tab
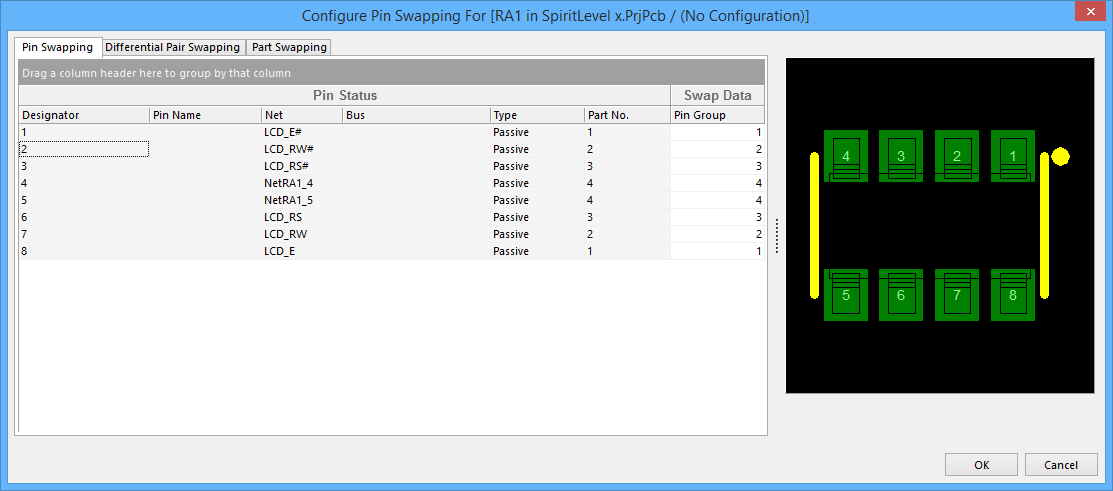
Configure Pin Swapping For Component dialog - Pin Swapping tab
A component pin is swappable with another pin in that component when it belongs to the same pin group. Use this tab of the dialog to view and organize the pin groups for your component. You can group the data to your preference or project requirements by dragging and dropping the column headers into the dark gray bar. You can also reorder the column headers by dragging them into a different horizontal order.
Options/Controls
Pin Status/Swap Data
The Pin Status and Swap Data sub-sections share a right-click menu, the options under which can be used to organize your workspace and swap groups. The following right-click menu options are available:
- Show/Hide Columns - use this to determine which columns are visible in the Pin Swapping tab of the dialog.
- Assign Pin-Swap Groups By - automatically assign pin swap groups by either Designator, Pin Name, Net, Bus, Type, Part No., Part Mode, or Pin Group. Select multiple pins before right-clicking in order to assign groups at the same time.
- Add To Pin-Swap Group - Create new or add to existing pin-swap groups. New pin-swap groups are automatically named using numerical values (e.g., 1, 2, 3, etc.,). You can add more than one pin at the same time by selecting multiple pins before right-clicking. Double-click within the Pin Group column to rename the group.
- Remove From Pin-Swap Group - Remove from pin-swap group. You can remove more than one pin at the same time by selecting multiple pins before right-clicking.
Differential Pair Swapping Tab
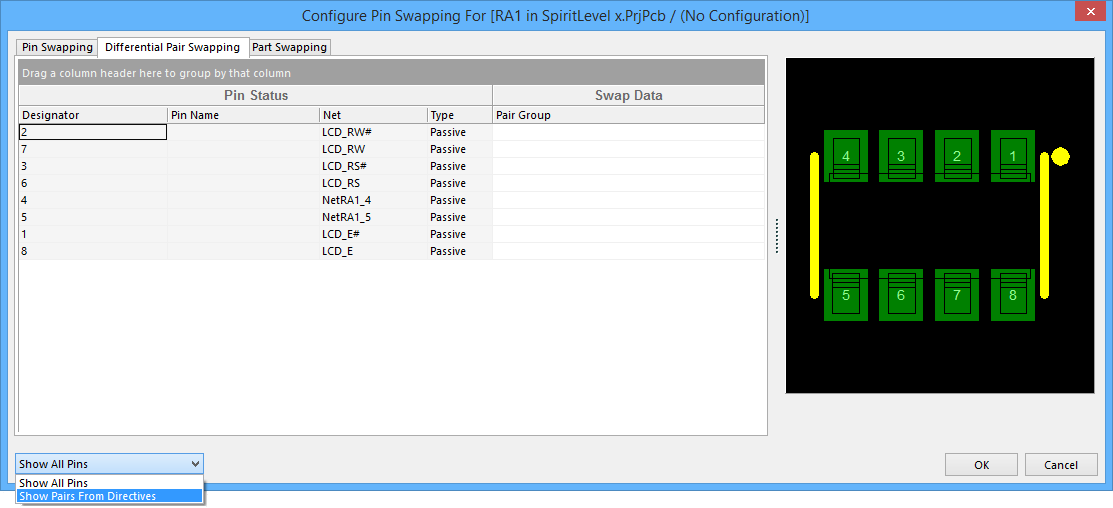
Configure Pin Swapping For Component dialog - Differential Pair Swapping tab
The swapping of differential pairs is governed by the value of the pair group for a differential pair. Use this tab of the dialog to view and organize the pair groups for your component. You can group the data to your preference or project requirements by dragging and dropping the column headers into the dark gray bar. You can also reorder the column headers by dragging them into a different horizontal order.
Options/Controls
Pin Status/Swap Data
The Pin Status and Swap Data sub-sections share a right-click menu, the options under which can be used to organize your workspace and swap groups. The following right-click menu options are available:
- Show/Hide Columns - use this to determine which columns are visible in the Pin Swapping tab of the dialog.
- Add To/Remove From Pair-Swap Group - create new or add to existing pair-swap groups. New pair-swap groups are automatically named using numerical values (e.g., 1, 2, 3, etc.,). You can add/remove more than one pair at the same time by selecting multiple pairs before right-clicking. Double-click within the Pair Group column to rename the group.
Part Swapping Tab
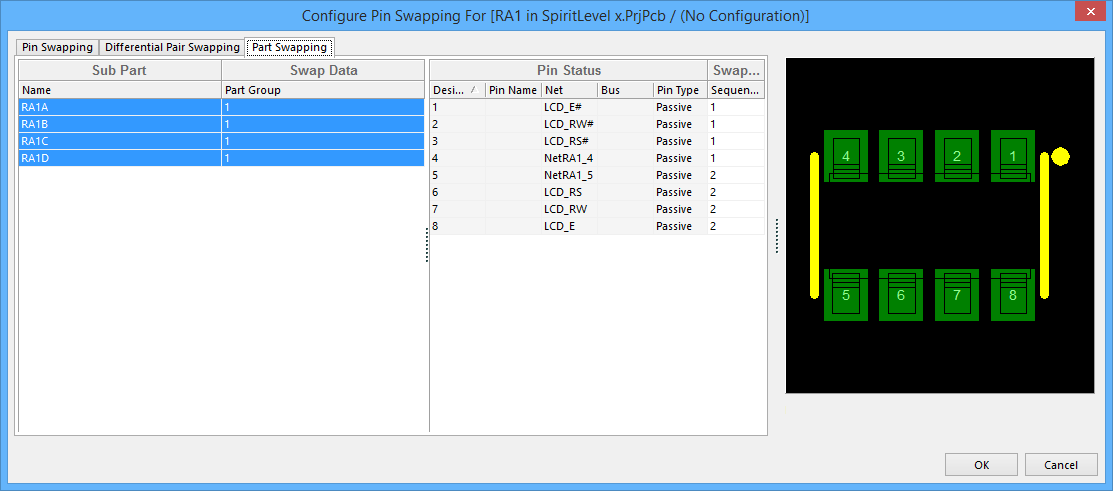
Configure Pin Swapping For Component dialog - Part Swapping tab
Part swapping for a component is configured with the part group and sequence ID attributes. The sequence ID attribute determines equivalence of the pins between swappable sub-parts. Use this tab of the dialog to view and organize the part groups for your components. You can group the data to your preference or project requirements by dragging and dropping the column headers into the dark gray bar. You can also reorder the column headers by dragging them into a different horizontal order.
Options/Controls
Sub Part/Swap Data
The Sub Part and Swap Data sub-sections share a right-click menu, the options under which can be used to organize your workspace and swap groups. The following right-click menu options are available:
- Add To/Remove From Part-Swap Group - create new or add to existing part-swap groups. New part-swap groups are automatically named using numerical values (e.g., 1, 2, 3, etc.,). You can add/remove more than one part at the same time by selecting multiple parts before right-clicking. Double-click within the Part Group column to rename the group.
Pin Status/Swap Data
The Pin Status and Swap Data sub-sections also share a right-click menu, the options under which can be used to organize your workspace and sequence IDs. The following right-click menu options are available:
- Show/Hide Columns - use this to determine which columns are visible in the Pin Swapping tab of the dialog.
- Assign Part/Remove Part Sequence Number - the sequence ID attribute determines equivalence of the pins between swappable sub-parts. Create new or add to existing sequence ID groups. You can add/remove more than one part to a sequence ID at the same time by selecting multiple parts before right-clicking. New groups are automatically named using numerical values (e.g., 1, 2, 3, etc.,). Double-click within the Sequence ID column to rename the group.