
Favorite Interactive Routing Widths
Other Related Resources
Parent page: PCB Dialogs
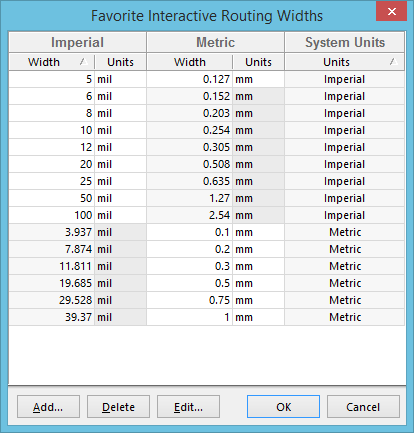
The Favorite Interactive Routing Widths dialog
Summary
This dialog provides controls to predefine favorite track widths to use when interactively routing a board using the Interactive Router.
Access
The dialog is accessed from the PCB Editor in the following ways:
- By clicking the Favorite Interactive Routing Widths button on the PCB Editor - Interactive Routing page of the Preferences dialog.
- By clicking the Favorite Interactive Routing Widths button in the Interactive Routing dialog, which is accessed while interactively routing by pressing the Tab key.
Options/Controls
- Widths Grid - this region of the dialog presents a listing of all currently defined interactive routing widths (the default set is shown in the image at the top of this page). For each defined width, the following information is presented:
- Imperial - the width in imperial units (mil).
- Metric - the width in metric units (mm).
- System Units - the preferred system units when using the defined width (Imperial or Metric).
- Add - click this button to add a new routing width to the list. The Preferred Routing Width dialog will open; enter the value required.
- Delete - click this button to delete the currently selected routing width(s) from the list.
- Edit - click this button to edit the currently selected routing width. The Preferred Routing Width dialog will open; use the dialog to edit the routing width.
Right-click Menu
The following commands are available from the grid's right-click menu:
- Add - use this command to add a new routing width to the list. The Preferred Routing Width dialog will open; enter the value required.
- Delete - use this command to delete the currently selected routing width(s) from the list.
- Show Imperial - use this option to toggle the display of the Imperial column and its data.
- Show Metric - use this option to toggle the display of the Metric column and its data.
- Show System Units - use this option to toggle the display of the System Units column and its data.
- Properties - use this command to edit the currently selected routing width. The Preferred Routing Width dialog will open; use the dialog to edit the routing width.
Using Favorite Widths
An incarnation of the Favorite Interactive Routing Widths dialog is accessed when you want to change the current routing width to one of the predefined favorites. Press Shift+W while interactively routing to access the Choose Width dialog.
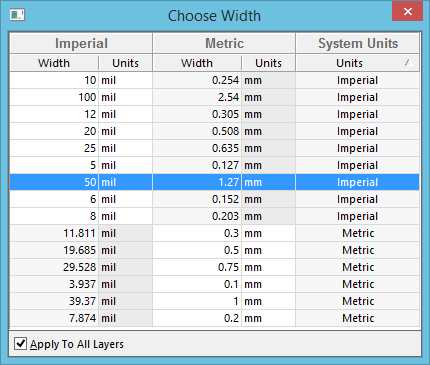
The Choose Width variation of the Favorite Interactive Routing Widths dialog
Options/Controls
- Widths Grid - this region of the dialog presents a listing of all currently defined interactive routing widths. Click on an entry to switch to using that routing width (in accordance with the boundaries of the applicable min-max routing Width rule).
- Apply To All Layers - enable this option to use the chosen routing width on all of your signal layers.